How to configure Network Information Systems
What is NIS?
NIS, or Network Information Systems, is a network service like LDAP that allows authentication and login information to be stored on a centrally located server. This includes the username and password database for login authentication, database of user groups, and the locations of home directories.
Configure NIS server
In this example I will configure a NIS server and a user Zillu will login from client side.
For this example we are using two systems one linux server one linux clients.
A linux server with ip address 192.168.1.100 and hostname Linux100
- A linux client with ip address 192.168.1.200 and hostname Client200
- Updated /etc/hosts file on both linux system
- Running portmap and xinetd services
- Firewall should be off on server
I suggest you as learner to review that article before start configuration of NIS server. Once you have completed the necessary steps follow this post.
There are many package are required to configure NIS server. Such as ypserv, cach, nfs, make, ypbind, portmap, xinetd check them if not install then install the package.
Step-1: Install the packages is required.
# yum □ install □ ypserv
# yum □ install □ cach
# yum □ install □ nfs
Step-2: Ensure that the service is set to start on system boot:
# chkconfig □ portmap □ on
# chkconfig □ xinetd □ on
# chkconfig □ nfs □ on
# chkconfig □ ypserv □ on
# chkconfig □ ypbind □ on
# chkconfig □ yppasswdd □ on
Or
# ntsysv
Step-3: open network file to setting NIS Domain name.
# vi □ /etc/sysconfig/network
NETWORKING=yes
NETWORKING_IPV6=no
HOSTNAME=linux100
NISDOMAIN=sandwip
Step-4: Now reboot the system.
# init □ 6
Step-5: Create a user named zillu and give his home directory on /nishome with full permission.
# mkdir □ /nishome
# useradd □ -d □ /nishome/zillu □ zillu
# passwd □ zillu
#chmod □ 777 □ /nishome
Step-6: Open exports file for shear home directory on the network.
# vi □ /etc/expots
/nishome/zillu *(rw,sync)
Step-7: Open Makefile for enable password, group and hosts update service.
# vi □ /var/yp/Makefiile
[On the line number 109, change the flowing below, Use :set □ nu on ESC mode for setting line number ]
106 # If you don’t want some of these maps built, feel free to comment
107 # them out from this list .
108
109 all : passwd group hosts netid \
110 # netgrp shadow publickey networks ethers bootparams printcap \
111 # amd.home auto.mater auto.home auto.local passwd.adjunct \
Step-8: Now restart the flowing service.
# service □ portmap □ restart
# service □ xinetd □ restart
# service □ nfs □ restart
# service □ypserv □ restart
# service □ yppasswdd □ restart
Step-9: Now change directory to /var/yp and run make command to create database.
# cd □ /var/yp
# make
Step-10: Now update this database by running these commands.
# /usr/lib/yp/ypinit □ –m
Note: – First add server and then add all client machines one by one. After adding press CTRL+D to save, confirm by pressing y]
Step-11: Now once again restart all this service this time there should be no error.
# service □ portmap □ restart
# service □ xinetd □ restart
# service □ nfs □ restart
# service □ypserv □ restart
# service □ yppasswdd □ restart
# service □ ypbind □ restart
Client configuration
Before you start client configuration we suggest you to check proper connectivity between server and client. Once you successfully completed necessary test then start configuration of client sides.
Two rpm are required to configure client’s yp-tools and ypbind check them for install.
Step-1: Checking the package.
# rpm □ –qa □ yp-tools
# rpm □ –qa □ ypbind
Step-2: Now open network file for setting hostname and nisdomainname.
# vi □ /etc/sysconfig/network
NETWORKING=yes
NETWORKING_IPV6=no
HOSTNAME=Client200
NISDOMAIN=sandwip
Step-3: Now reboot the system.
# init □ 6
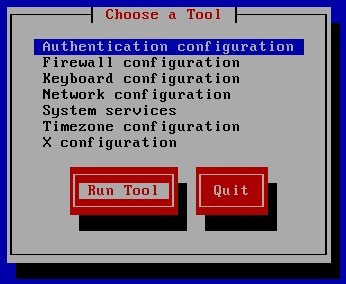
Step-4: Now run setup command and select authentication configuration from list and enter Run tools.
#setup

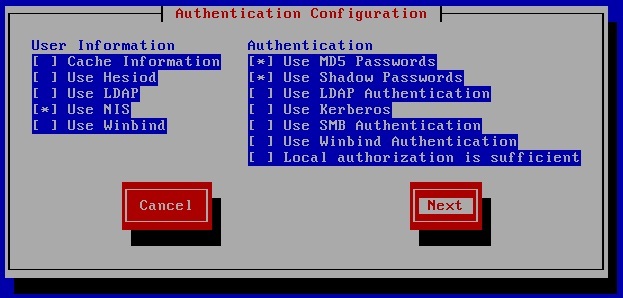
Now check mark on NIS and enter on next.

Set domain name to sandwip and server to 192.168.1.100 and click on ok

No error should be occurred here if you see any error then check all configurations.
Step-5: Now open auto.master file in the end of file do editing of /nishome as shown here.
# vi □ /etc/auto.master
#
+auto.master
/nishome /etc/auto.misc
Step-6: Now open auto.misc file in the end of file do editing of user zillu as shown here.
# vi □ /etc/auto.misc
# jaz -fstype=ext2 :/dev/sdc1
# removable -fstype=ext2 :/dev/hdd
Zillu -rw,soft,intr 192.168.1.100:/nishome/zillu
Step-7: Ensure that the service is set to start on system boot:
# chkconfig □ autofs □ on
# chkconfig □ ypbind □ on
Step-8: Now restart the flowing service.
# service □ autofs □ restart
# service □ ypbind □ restart
No error should be occurred here if you see any Field then check all configurations.
Step-9: Now restart the system
# init □ 6
Login from zillu user on client system
