
Configure Dynamic Host Protocol
One of the basic elements found on all networks is a Dynamic Host Configuration Protocol (DHCP) server, making it an important part of any network. DHCP makes network administration easy because you can make changes to a single point (the DHCP server) on your network and net those changes down to the rest of the network. DHCP distributes IP on its network. So, it is an integral part of any network and a core functionality that every network contains.
Prerequisite for Configure DHCP Server
- Yum procedure
- IP Setting & Hostname Setting
- Iptables Flash & Network reload
- Hosts profile update
- DNS Server
Installing a DHCP Server
Strangely, the DHCP server package is called DHCP, while the service is called DHCP.
Step-1. Start by installing the DHCP package:
# yum □ install □ DHCP*
Step 2: Verify that the package is installed correctly:
# rpm □ –qa □ DHCP*
Step 3: Make sure that the DHCP service starts when the system boots as well:
# chkconfig □ dhcpd □ on
OR
# ntsysv
Configuring the DHCP Server
To start the configuration, let’s look at the important files that handle the options for the DHCP service:
/etc/dhcp/dhcpd.conf [Main config file for the DHCP service using IPv4 addresses on RHEL-6]
/etc/dhcpd.conf [Main config file for the DHCP service using IPv4 addresses on RHEL-5]
Note: But dhcp. conf (file) copying from /usr/share/doc/dhcp-3.0.5/dhcpd-conf.sample
/etc/dhcp/dhcpd6.conf [Main config file for the DHCP service using IPv6 addresses on RHEL-6]
Step-4: To copy the sample file, use the following command:
# cp □ /usr/share/doc/dhcp-3.0.5/dhcpd.conf.sample □ /etc/dhcpd.conf
Note: This file will be overwriting.
Step-5: Edit the Forward lookup zone file to declare the DHCP server on the DNS.
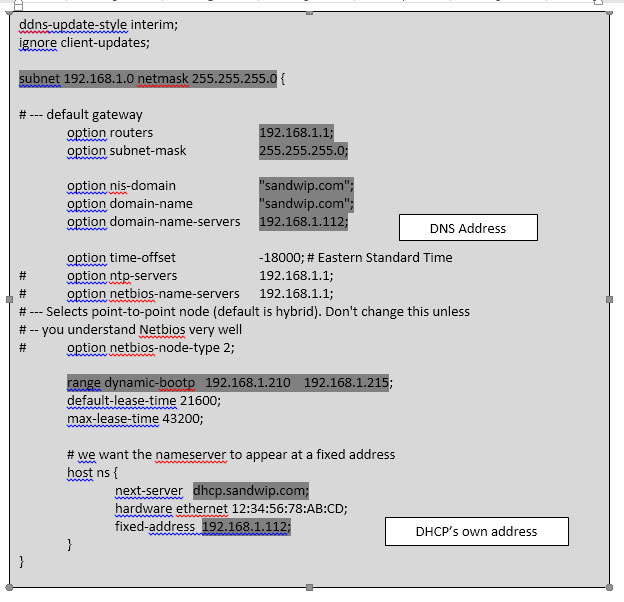
Step 6: Edit the main configuration file (/etc/dhcpd.conf).
# vi □ /etc/dhcpd.conf
Step-6: Use iptables to create the required firewall rule:
# iptables □ –I □ INPUT □ 5 □ –p □ udp □ –m □ – – dport □ 67 □ –j □ ACCEPT
Step-7: Save the firewall rule you just created.
# service □ iptables □ save
Step-8: Then restart the iptables service.
# service □ iptables □ restart
Step-9: Restart the DHCP service for the change to take effect:
# service □ dhcpd □ restart